Friday, May 29, 2015

Boxed in straight lines.

I'm continuing with my box theme from last post. This time, a box for my Zentangle® tiles. I thought I'd combine the box with this week's Diva Challenge #219 straight lines. I decided ING was a nice tangle with all straight lines. But what to embellish with? Hey wait, look at all those nice triangles, those are just perfect for Maryhill! I call it MaryhillING.
Last post I made a slider box with my Ultimate tool from Crafters Companion. Although this tool is great for boxes, I thought I'd try today's box without it so you can see you dont have to have it. A scoring board is nice (I used my Scor-it) but you can just score with a stylus or folding bone and ruler. Cut two pieces of cardstock 6.75 inches square. I cut one from a heavy pearlescent cardstock scrap. The second from a lighter weight watercolor paper (in hindsight a heavier weight might have been nicer). Starting with the lid, I scored at 1.5 inches in on all 4 sides. Next I die cut my square by centering it. No measuring, it's easy to center once the score lines are there. You don't have to have a square die. Any shape that is smaller than your center square should work. For that matter you don't have to die cut it, you could measure and cut out a square with a craft knife. Or you don't have to have an opening at all, just a solid box. If you do elect to cut an opening in your box lid, cut a piece of acetate a little larger and carefully glue it to the inside. I have a selection of acetate from used packaging to select from.  I then cut a frame to cover up the glue on the inside. Pretty easy to do with nesting dies. After die cutting my lid, the score lines were flattened out, so I re-scored them. Next I cut out the small triangles as shown in the picture above. Just cut on the score line up to where it intersects and then (from the small square side) cut up to meet at the intersection.  Do this four times.  Now comes the fun ... tangling! I suggest drawing, shading and spraying with a fixative before assembling. You can use a post-it or a scrap of paper to cover the acetate while spraying the fixative.
For the base, remember you are starting with the same size square, or in this case, 6.75 inches. Score at 1 9/16 (so just 1/16 larger than the score marks on the lid) on all four sides. This gives you a slightly higher side and a slightly narrower base so it will easily fit inside the lid.  Fold and cut out the notches just like the lid. Glue (I suggest a wet glue, like school glue.)  Ta-da a custom box for your tiles! Of course you can adjust the size to make any size box you want. Can you guess what size I'm gonna do next?

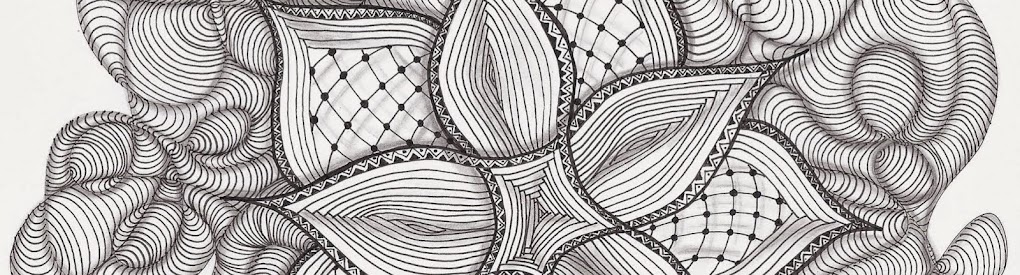
I enjoyed the straight line challenge, but since I just used two tangles, I thought I'd try more. I'm always impressed with Lily Moon's Zentangle pieces. She does such a nice job with contrast and sometimes adds black to the point where I'm wondering if it's a black tile or a white tile. I might have gotten carried away with the black, but, in any event, thanks for the inspiration Lily!
Tangles are Hollibaugh, Hibred, Knase, Cadent (with Cubine center), Rick's Paradox, Tripoli, and Hurry.


Saturday, May 23, 2015

Slider pen boxes!

I love boxes! I've been working on a slider box to accommodate my Sakura microns, well some of them! Then the Diva Challenge #218 came along : White on Black or Found (object) and I decided to also make a box for Gelly Rolls. I have The Ultimate from Crafter's Companion which is awesome for making boxes. I also have the boxer board. You don't have to have either but it sure makes measuring easier! I ran across this video that is great to explain the concept so that you can make whatever size boxes you want. I figured out my measurements after watching the video. I did use wet glue instead (Scotch Quick Dry Adhesive). And I would suggest making your first box from scrap or inexpensive card or even paper, just to get the measurements right. I made a few samples before I was happy with the result. For my final versions, I used a heavyweight pearlescent cardstock for the drawers. For the wrap around of the Micron box (white) I used watercolor paper. For the Gelly Roll (black) box I used Strathmore Artagain paper. I cut and scored my paper before drawing, then used a fixative before gluing. Best of all, the boxes fit into my Art Bin so my pens can always be horizontal even when I'm toting them to class. I have the Art Bin Super Satchel Double Deep with the dividers thanks to a suggestion from fellow CZT Juliette Fiessinger. One of these days I may just fill up an entire section of it with boxes of pens and pencils! (ok, maybe more than one section.)
Pre-assembly
Tangles used: Nipa, Meer, Twing, Quandary, Printemps, Auraknot, Huggins, Cadent and Shattuck.

I'm thinking a class where I have the boxes pre-cut would be fun. We could tangle in class and I could show students how to assemble. Whaddaya think?

Friday, May 22, 2015

Fun with ATC's

I'm always running short on ATC's (Artist Trading Cards) as I use them instead of business cards. I prefer to give a handmade one-of-a-kind piece of art. I've also been known to leave a few here and there, almost as RAZ (Random Acts of Zentangle) however I do include my name and blog address on the back. Sometimes I warm up or practice on an ATC. Here are a few I've done lately. For the continuous Maryhill, I just kept drawing string lines until I had lots of triangles and then filled in with Maryhill.
This panda is a stamped image from Onyx Xpression that was a scrap. Months ago I was making a card and it wasn't satisfactory, maybe the color wasn't right, maybe I wasn't happy with the amount of ink I put down...who knows, I can't even tell you what ink I used at the time. I cut it down to 2.5"x3.5", rounded the corners, and tried to figure what it needed. I ended up adding Keeko as an all over pattern (except over the pandas) and the effect is really nice. A little hard to see in a photograph tho.
I tried the same thing with this Quandary by adding the Keeko in stardust again. It has a nice subtle all over shimmer.
Here is a technique I've used before, cleaning my stencil onto ATC's. I used the color it left as my string and added Tipple and Yincut in Sakura metallic gellyrolls.
And again, this time Shattuck with Sakura moonlights.
This one just shows how forgiving Maryhill is. I really wasn't taking my time and my lines were quite shaky. Shading helps a lot! You'll also find Printemps and Diva Dance.

Enjoy your weekend!

Friday, May 15, 2015

Renaissance Dex, Bunzo and so much more...

Dex & Bunzo
I've been practicing with the Zentangle® Renaissance tiles and colors in preparation for my class later this month. I started with the tiles, then tried Strathmore Art paper. The tiles, of course are a wonderful texture though a little soft. I moved to the Strathmore paper because I didn't want to use up tiles intended for students! Need to order more.... Anyway, I enjoyed the Strathmore color but the texture was non existent in the brown. I also tried a gray blue with nicer texture, but color didn't want to blend as well. Even tho I used blue paper, I continued with the traditional colors of black and brown ink (Sakura Microns), pencil (Cretacolor woodless graphite) and white (General's Charcoal White pencil). The Diva Challenge #217 came along while I was working on the blue, so I dedicated a "tile" to The Duo Tangle challenge Dex and Bunzo in honor of Laura's birthday. Be sure to check out the other entries. It's always fun to see all the different approaches to the challenge. Instead of just showing you the challenge tile, I thought I'd show you both pages I've been working on.
Full page before shading
Full page, plus shading & highlights
Finery, Hibred, Onamato, Shattuck, Avreal and Meer
Squid (plus Squill upper right and Tripoli lower left)

And the brown
Marasu, 'Nzeppel, Hollibaugh, Tipple, Zander, Knightsbridge (and Well upper right)

Friday, May 8, 2015

It's a good thing I've got backup!

I haven't finished much this week! Only the tile for my May Renaissance class flyer. (check out the "Class info" tab next to the "Home" tab above) I have lots started, but I'm easily distracted! I like to think of it as lots on the back burner... Anyway, thought I'd share some of the things I worked on while I was in Moab (that got finished!). My favorite is this new journal cover. It's done with black and purple Sakura Microns on cold pressed watercolor paper 5 1/2 inches x 8 1/2 inches (Sorry but I didn't note the brand or weight). I shaded with watercolor and graphite. Tangles are Umble, 'Nzeppel, a Zander/Enyshou combo, Dex, Fife, W2 and Shattuck.

On the flip side of the piece is this Mooka. This page is now laminated and the front cover of my current bullet journal. The old cover held up well, but I needed a change so I'll repurpose that cover. For more info on my first bullet journal, check it out here. I'm really enjoying this type of planner. You can customize it to be anything you want. I keep daily journal notes, to do lists, ideas (you know, things I'd usually jot down on a scrap of paper and then lose) nice paper to draw on, pockets for tiles and ATC's, I even have a page for notes on box construction sizes (oops, that's one of my current projects I'm not finished with...more later).

While I was in Moab, the Diva's challenge, # 212, was UMT Fanz By Susan Goetter. I did a couple ATCs but wasn't successful posting them then. Here they are. The ATC's have since been given away. That's Snookums that sits on the string in the ATC below. It makes a great base for Fanz.


Saturday, May 2, 2015

Shattuck monotangle labyrinth

The Diva's 215th challenge goes hand in hand with World Labyrinth Day, 5/2/2015! I used the link provided by Laura to draw my labyrinth. I will fess up to needing to erase my string and start over again. Once I had the string figured out, since I used only one tangle, the tangling went easily. Two photos, before and after shading. I used a purple Sakura Pigma Micron and a cool gray Copic Multiliner with shading in graphite and colored pencil.
Before shading

Friday, May 1, 2015

Puzzle picture perfect

I'm glad I converted this to black and white, otherwise I might have had to make it into a puzzle!

Beyond the Basics: Shading Class tiles

In this class we practiced different shading techniques from pen strokes to graphite. We also played with form shadows and cast shadows. We learned that contour lines and hilites go together nicely.

Too bad I forgot to photograph Nipa.
...And this week's payment envelopes of note.....
( FYI, All artwork for this post is created by students.)