Sunday, June 29, 2014

Window shopping

Can you believe a photo from last week's series was selected/displayed on The Weekend in Black and White? I'm thrilled!
This weekend's entry was taken in Wallace Idaho while walking through the historic downtown area.


This second photo was taken on the Coeur d'Alenes Trail in nearby Osburn. I had intended it for the black and white entry, but it just didn't glow in black and white like it does in color.


Friday, June 27, 2014

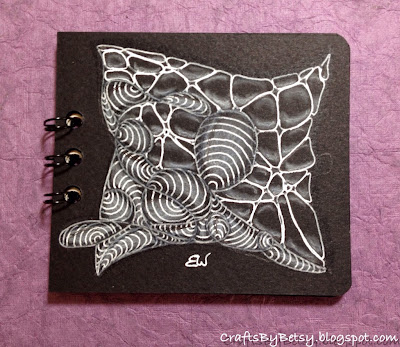
Isometric redux

I am the Diva's guest challenge this week (#173) is Redux, remix, revisit your comfort tangle(s) by changing things up a bit. I liked 'Nzeppel's look from the very beginning. When I found out the grid doesn't need to be consistent, I liked it more. Then when I realized the lines could be curvy too, I loved it! Isochor was a challenge to figure out, but once I relied on the shading, I was in awe of its look. Now to change them both up a bit... I hadn't tried 'Nzeppel using a pencil grid vs pen. Way cool. And to change it up a bit more, I just haven't made friends with the black tiles and the white gel pen, at least not before the CZT training. I still had a little problem with shading vs hiliting, but I think with a little more practice, we'll be good buddies. Thanks BJ for the cute "little black book" which has a drawing area that matches the 3 1/2 by 3 1/2 tiles!

Sunday, June 22, 2014

One stroke at a time...

Well the challenge may be The Weekend in Black and White, however for me, it was my Week in black and white...and endless shades of gray. I just completed my CZT training, class 14 in Providence, Rhode Island. What an awesome experience! Thank you to the city, the fabulous staff at Hotel Providence, all the wonderful people I met, my encouraging husband (he truly is the best) and Rick and Maria and the warm welcome from the Zentangle® family, of which I now belong.
These are some of my favorite black and white photos of Providence. This city renders/offers itself so well in shades of gray.


And just a touch of color.


Friday, June 20, 2014

Thank you Penny Black

I received this stamp set from Penny Black. Isn't it nice?

Supplies used:

Stamps: Penny Black's sunny hello

Inks: Versa Magic multi-surface chalk inks in Mango Madness and Persimmon

Ranger Adirondack Earthtones in Butterscotch and Lettuce

Tsukineko Momento in Rich Cocoa

Ranger Distress inks in spiced marmalade, antique linen and brushed corduroy

Die: Spellbinder's Nestabilities oval.


Friday, June 13, 2014

Maryhill

No wonder I had circles on my mind. I had recently finished the Diva Challenge #169 making your string out of circles. We were camping at Maryhill State Park and the campground is basically a circle. Washington State's Stonehenge replica ia nearby and there are windmills on the cliff. Circles abundant. Could this be my first true zentangle pattern? I think so.


Maryhill
Start with a basic shape or string. A circle works nicely, or how about a Zendala? Divide it up into pie segments, any number. Work one segment at a time. Draw an inside aura from the left side and stop just before reaching the right side of the segment. Then bring your line to the center. It helps if you turn your tile as you move from the left to right stroke to the downward stroke. Repeat to fill in the segment. Repeat in the rest of the segments. See how that windmill shape just magically appears? Try different shapes, or different numbers of segments. Try skipping every other segment and fill with another tangle (it looks awesome with Paradox don't you think?) Try filling in every other segment with a reverse Maryhill.
**Update : Check out the "Maryhill" label to the right for all my Maryhill examples and variations!


The Zentangle® Method is an easy-to-learn, relaxing, and fun way to create beautiful images by drawing structured patterns. It was created by Rick Roberts and Maria Thomas. "Zentangle" is a registered trademark of Zentangle, Inc. Learn more at zentangle.com.

Saturday, June 7, 2014

Glazed daisies

My entry for The Weekend In Black and White. Be sure to check back next Friday. I am working on a new tangle pattern! If you like Zentangle®, check out this week's post that combines it with rubber stamping!


Friday, June 6, 2014

Butterfly wishes.

This is an example of combining rubber stamping with Zentangle®. For another example, check out this earlier post. This wonderful butterfly image is Paper Parachute's Three Butterflies. The one stamp includes the butterflies and the rectangle border and is sized very nicely for an A2 card leaving room for a mat.
This is the stamped image alone. I used Momento ink in gray flannel on Strathmore Bristol 100 lb card.

Next I drew a wonky grid using an 01 Sakura Pigma Micron in purple.

I added zentangle patterns Well and Yew-Dee using the 01 and an 005 still in purple. I shaded it with a purple violet Faber-Castell Polychromos color pencil.

Since the butterflies had all but disappeared, I decided to use vibrant colors and layered several yellows and oranges again with the Polychromos. I've been practicing with the color layering and really found this You Tube by papernlaceprincess to be very helpful. In this photo, the center butterfly is nearly done, but the other two just have the base color applied.

When I started, I didn't have a color plan. I routinely refer to a color wheel and this time needed something to tie the colors together yet show off the buterfly images. Since I had yellow, orange and violet at this point, I decided to go for the tetrad by adding blue for the edge of the wings, shading and the card base.
This is a lot of effort for a card, but a special card is the result. You could choose to mat and frame this for a lovely gift instead, or keep yourself!

The Zentangle® Method is an easy-to-learn, relaxing, and fun way to create beautiful images by drawing structured patterns. It was created by Rick Roberts and Maria Thomas. "Zentangle" is a registered trademark of Zentangle, Inc. Learn more at zentangle.com.