Friday, March 28, 2014

Photo...sketch...color...tangle

This is my end result zentangle® inspired art.
Start with a photo...
Then sketch... add color ...and tangle
Or, if you are not comfortable with sketching (but you really should try it) how about...
Stamp...
Color and tangle.
The sketch was done on Strathmore cold press water color paper using Derwent Inketnse watercolor pencils. The stamped flower is fresh bloom by Stampendous on white cardstock. The sentiment is from Penny Black's every happiness set. Both use Sakura Micron pens and variations of the tangle pattern 'Nzeppel.
The Zentangle® Method is an easy-to-learn, relaxing, and fun way to create beautiful images by drawing structured patterns. It was created by Rick Roberts and Maria Thomas. "Zentangle" is a registered trademark of Zentangle, Inc. Learn more at zentangle.com.


Friday, March 21, 2014

Simplicity card challenge

While looking online, I ran across Heather Telford's "Just add water" card for the One Layer Simplicity Challenge. Heather's work usually catches my eye as it's amazing! One layer simplicity rules include making a card with only one layer. Period. This challenge was to do so incorporating the use of water in creating the card. I really had to think through placement of the stamps before beginning this card.
I used Strathmore 140 lb hot press watercolor paper. Images are from the Penny Black flower gallery stamp set. I used Versa-fine instant dry permanent ink, onyx black for the flower image and stamped "thank you" with a combination of Momento summer sky and grape jelly. Background and flowers were colored with Derwent Inktense watercolors. I used a similar technique for the background as Heather's sponging tutorial, but substituted water, watercolors and a brush for ink and sponging.


Friday, March 14, 2014

Hello sunshine!

An A2 (4 1/4" x 5 1/2") card, I'm calling this one a double gate fold. It evolved from this card when I questioned "what if it wasn't square?"

Start with light weight cardstock (to accommodate the folds and not be too heavy or bulky) that is twice the size of the card you wish to make. For my A2 card, a standard sheet of 8 1/2 " by 11" is perfect. Score one quarter of the way in from both sides both horizontally and vertically. For my example that is 2 3/4" and 8 1/4" on the long side and 2 1/8" and 6 3/8" on the short side. Remove the corners. I suggest cutting just past the score line to make it fold easier. Fold carefully butting the gates up to each other. Fold both gate sets making sure they close smoothly. This may require a touch more trimming just to make sure both gates close easily over the other set.

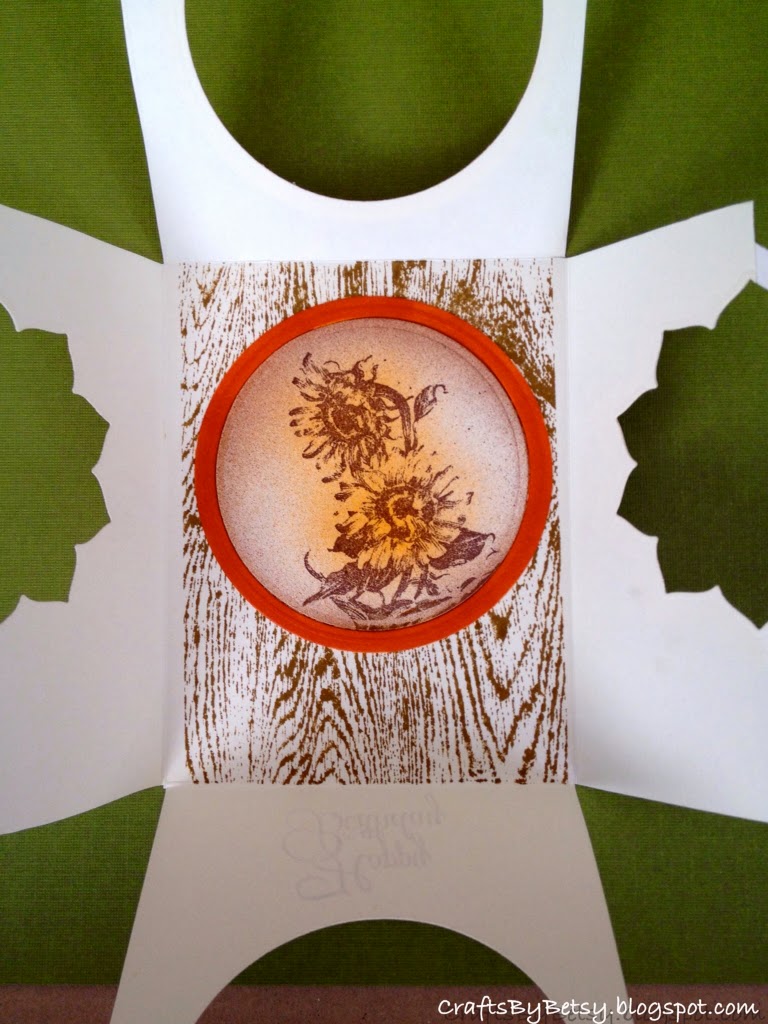
Now you are ready to cut the openings. For my first card, I used Spellbinders nestabilities standard circles large for one set of gates and Spellbinders nestabilities blossom two for the other set. To cut, open the card, position the die cutting side up in the center of the card. When you are happy with the placement, fold the set of gates you wish to cut over the die, add your cutting plate and run through your die cutting machine. Repeat for the second set of gates. (Note, if you are using only one shape like my second card, you can cut all 4 gates at once.)

Decorate your card taking advantage of layering. I stamped Penny Black hello sunshine for the center image. The background is Stampers Anonymous wood grain from the TimHoltz collection. The frames were cut using the above mentioned spellbinders. The front sentiment is from Penny Black sweet wishes.

The second card uses one shape, Spellbinders nestabilities standard circles large for all 4 gates and shows how effective the layering can be using Spellbinders sprightly sprockets set by Donna Salazar.

Friday, March 7, 2014

A little bird for Katie

This week's project is an A-2 (4 1/4 x 5 1/2 inch) card using 3 dies. Two from Elizabeth Crafts designs, the Katie Label Pivot Card from the POP IT UPS collection by Karen Burniston, and Birds.
The Katie label die includes different sizes of labels so that I could cut a label frame from which to hang this cute little bird. The bird has the same detail front and back when he twirls on the embroidery floss. In the back, I was also able to sandwich another die, from Spellbinders, Botanical Swirls, in between the label layers.

On the front I played with a tangeation of Etcher using the Zentangle® approach. I started with the tangle on 4 1/4 x 5 1/2 inch card then trimmed slightly. I drew a template and cut my drawing into 3 pieces. Perfect for two of this card and a third cool shape for a later project.
I hope you enjoy!

The Zentangle® Method is an easy-to-learn, relaxing, and fun way to create beautiful images by drawing structured patterns. It was created by Rick Roberts and Maria Thomas. "Zentangle" is a registered trademark of Zentangle, Inc. Learn more at zentangle.com.