Showing posts with label hexagons. Show all posts

Friday, July 20, 2018

One thing leads to another, and another....

While I was working on last week's Borromean rings, I had this mess on my desk.  As I'm easily distracted, I decided I needed to make a box!  I took a piece of years old paste paper that didn't yet have a purpose, and I cut it to size for an envelope.  I used a recently acquired envelope punch board by We R Memory keepers and made an envelope.  Then I added an extra score line on all four sides to turn it into a box, or maybe a dimensional envelope would be a better description.


The paste paper already had a Static-like pattern and I wanted to accentuate that but not cover it up.  I decided on a die cut image.  This is Elizabeth Craft Moda Scrap 1322 Lacy Poppies. I glued in a piece of acetate behind the die cut opening and then glued the thin petal lines (is that the negative...or the positive?) to the acetate.  When I glued the envelope together, I left enough of the bottom flap unglued so that I can tuck in the top flap for closure.  


There, that looks better!  Can you tell I like boxes?  And that reminds me.....(like I said easily distracted) a few weeks back I made some cool little boxes from an envelope die.  
examples using copy paper


and using thicker paste paper after adding score lines to make a box

I used Spellbinders Grand Shapeabilities Hexagon Petal Envelope LF-007.  It makes an envelope if you use thin enough paper (the blue examples above).  It's more 3 D with heavier cardstock.  But again, I wanted some dimension to store some hexagon drawing tiles.  So after die cutting I added an additional score line on all 6 sides for this result.  This too was cut from my paste paper stash.  


This tile has a pencil string that is traced from a recent clearance bin purchase of a Minc Heidi Swapp stencil.  The stencil isn't in the best condition as its warped, but I was able to hold it flat to trace.  Oh, I think I see another distraction coming on.....Reticula and Fragments here I come again! Until...squirrel....!  ;-)

Thanks for stopping by!

Wednesday, July 4, 2018

July BuJo and June's tangled habits

I used a Zentangle® fragment again for my July calendar.  The grid and numbers are done in black Pigma micron and each fragment in gray (graphite color) Graphik line maker. The fragment is P5.

Then I got to wondering if I could put that fragment into a hexagon.  Here's how it turned out.  
Start in the center and draw 3 lines radiating out.

Now stretch your fragment into each diamond. 

Next I added weight to the lines.

3 hexagons with P5 fragment.

Reticula and fragments. P5.

Makes me think you could likely stretch any square fragment to fit a diamond and repeating 3 times in the hexagon.  Uh oh, is there another hexagon series in the works?  If you want to see my hexagon play, click on the hexagon label to the right.  

And here is my follow up habit tracker for June; also a fragment, A5.

And I tried something new for June too, encouraging and counting specific habits.  I basically drew a string scene in pencil using stencils, drawing around dies and simply drawing shapes.  Here it is early on in the month.  

And here it is after I filled in the stuff I did.  It was fun and I think I'll try that again!

Thanks for stopping by!  Happy 4th!

Tuesday, February 13, 2018

I Heart Bumpadox


Hi! I thought you might enjoy a step-out for a "hearty" Valentines tile or two.....

It utilizes Carole Ohl's Bumpadox and Rick's Paradox.  If you haven't tried Paradox, I suggest you play with it a few times first.  And when you're familiar with it, give a warmup try with Bumpadox.  Now on to the heart!


I started with a hexagon tile that I cut with my die cutter using Spellbinders hexagon nestabilities dies.  But if you don't have a hexagon tile to work with, you can use a stencil, or fold or cut a template to make your own (there are you-tubes out there showing folding one for example.  But if that's not your speed, don't lose hope, I'll show another alternative shortly)....

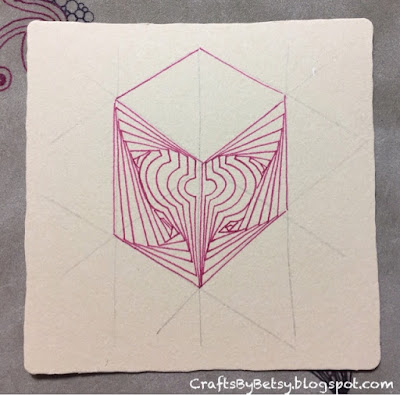
I outlined my hexagon shape then found the center point. To find your center point, visualize a line (but don't draw it) from one point to its opposite point and hover your pen over the approximate center of that "line". While you hold your pen steady over that spot, visualize an intersecting line from two other opposite points (it doesn't matter which 2, just that they are opposite of each other.  Adjust your pen so that you are over where those two imaginary lines would intersect and make a light dot.  That's the center.  Now draw a line from the center to any one of the points.  Skip the next point of the hexagon and draw another line from the center.  Skip another and draw a third line from the center.  Do you see you made a cube?  And your cube consists of 3 diamonds? It's this diamond shape, or rather two side to side diamonds that creates a heart like shape with Bumpadox.

And draw a line with with a bump about 2/3rds of the way up.  (Note, I actually draw my Bumpadox from the point, so I turn my tile upside down pulling my line toward the center point to more comfortably draw the line.)

And draw a mirrored line in the other diamond.

Choose one of those two diamonds and continue with paradox, bumping out just the one side.

And now mirror the other side.  

You have the basic heart.  Don't fret if it's not exactly heart shaped...you can adjust it with shading as you'll see soon.

You could draw paradox or another Bumpadox in the remaining diamond, however I chose to split the diamond into two triangles...

And mirrored more Paradox.  


Now for rounding out that heart shape (with colored pencil in my case, but you could also do this with graphite).  And some more shading here and there.  I tend to emphasize where the lines come together.  


And I added just a touch of graphite.   

Here is the completed tile in my diorama card.  (I'll be sharing more information about the making of these cards soon.

While scrolling through the Mosaic app recently, I ran across a triangle fragment, Heartwell, by Valerie Hayes.  If you're on the app, check her out and her February 11, 2018 tile.  Her tile was on a triangle grid and it was obvious to me that that is certainly a way to construct a hexagon grid as well, you just need to visualize the hexagon as a gathering of 6 triangles coming together in a point.  So here's my version.....

I typically draw the horizontal lines first and then the angled lines.  As you can see, my hexagon isn't perfect, but it works just fine.

Once I had the grid penciled and the hexagon inked, I turned my tile a quarter turn to see the cube.  

And continued as I did in the tile above.

This time I went crazy with filling in all the remaining triangles with mirrored paradox.

Here's a glimpse of what's to come.

I hope you enjoyed this and give it a try!

Thanks for stopping by....check back soon if you're interested in diorama cards (3D boxes that fold flat and fit in an envelope for mailing.) 


Tuesday, December 12, 2017

Hex 9 Fragments...and more!

Foxy's been building away and wanted to show off a few more reticula and fragment examples.

So simple...I see twisted rope.  

And here I see Static.

A Meer fragment that creates a triangle.

Some Striping or side by side Meer.


And yet another hexagon, sort of a gem quality to it.

Perhaps Foxy is done for awhile with these alternating triangles?  (For more about Foxy see my last post. For more hexagon fun, check out the hexagons label to the right or click here.)

I also thought I'd share my BuJo calendar featuring Organza Again.

And then, in honor of MoFins being included at Tanglepatterns.com (woohoo!) I had fun with this.  
First I had fun with a dirty stencil.  I had been playing around with my Distress Oxide ink pads and one of my favorite stencils from Crafter's Workshop, cosmic swirl.   It pays not to clean your stencil sometimes.  All I had to do was mist the stencil with water and then apply paper to it.  These 3 were done on Bristol smooth.  They are roughly the size of ATCs.  

But this larger one (about 4 1/2" x 6")....this one I claimed for MoFins!

I added the first step of MoFins, but then Maryhill wanted to play, so it would've been a duotangle...

Until I realized that Mooka had been there all along, it just needed a little coaxing with colored pencil.

And then I decided to be brave and do this...
Yup, I cut it!  But I had a plan.  After stacking several layers of letters (bold alpha dies by Altenew) and outlining in marker, I returned them to the piece


I'm calling Dream Big! Shown here on a card base that's 5" by 6 1/2"
Thanks for stopping by.  And thanks too, if you choose to leave a comment!  Have a good day!