Showing posts with label tutorial. Show all posts

Tuesday, February 13, 2018

I Heart Bumpadox


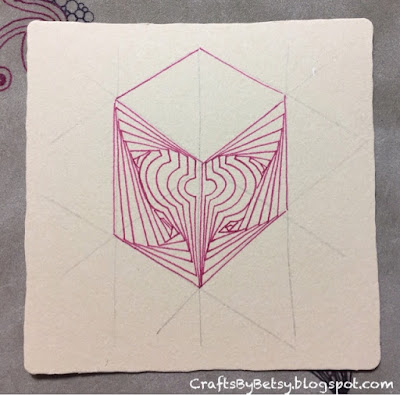
Hi! I thought you might enjoy a step-out for a "hearty" Valentines tile or two.....

It utilizes Carole Ohl's Bumpadox and Rick's Paradox.  If you haven't tried Paradox, I suggest you play with it a few times first.  And when you're familiar with it, give a warmup try with Bumpadox.  Now on to the heart!


I started with a hexagon tile that I cut with my die cutter using Spellbinders hexagon nestabilities dies.  But if you don't have a hexagon tile to work with, you can use a stencil, or fold or cut a template to make your own (there are you-tubes out there showing folding one for example.  But if that's not your speed, don't lose hope, I'll show another alternative shortly)....

I outlined my hexagon shape then found the center point. To find your center point, visualize a line (but don't draw it) from one point to its opposite point and hover your pen over the approximate center of that "line". While you hold your pen steady over that spot, visualize an intersecting line from two other opposite points (it doesn't matter which 2, just that they are opposite of each other.  Adjust your pen so that you are over where those two imaginary lines would intersect and make a light dot.  That's the center.  Now draw a line from the center to any one of the points.  Skip the next point of the hexagon and draw another line from the center.  Skip another and draw a third line from the center.  Do you see you made a cube?  And your cube consists of 3 diamonds? It's this diamond shape, or rather two side to side diamonds that creates a heart like shape with Bumpadox.

And draw a line with with a bump about 2/3rds of the way up.  (Note, I actually draw my Bumpadox from the point, so I turn my tile upside down pulling my line toward the center point to more comfortably draw the line.)

And draw a mirrored line in the other diamond.

Choose one of those two diamonds and continue with paradox, bumping out just the one side.

And now mirror the other side.  

You have the basic heart.  Don't fret if it's not exactly heart shaped...you can adjust it with shading as you'll see soon.

You could draw paradox or another Bumpadox in the remaining diamond, however I chose to split the diamond into two triangles...

And mirrored more Paradox.  


Now for rounding out that heart shape (with colored pencil in my case, but you could also do this with graphite).  And some more shading here and there.  I tend to emphasize where the lines come together.  


And I added just a touch of graphite.   

Here is the completed tile in my diorama card.  (I'll be sharing more information about the making of these cards soon.

While scrolling through the Mosaic app recently, I ran across a triangle fragment, Heartwell, by Valerie Hayes.  If you're on the app, check her out and her February 11, 2018 tile.  Her tile was on a triangle grid and it was obvious to me that that is certainly a way to construct a hexagon grid as well, you just need to visualize the hexagon as a gathering of 6 triangles coming together in a point.  So here's my version.....

I typically draw the horizontal lines first and then the angled lines.  As you can see, my hexagon isn't perfect, but it works just fine.

Once I had the grid penciled and the hexagon inked, I turned my tile a quarter turn to see the cube.  

And continued as I did in the tile above.

This time I went crazy with filling in all the remaining triangles with mirrored paradox.

Here's a glimpse of what's to come.

I hope you enjoyed this and give it a try!

Thanks for stopping by....check back soon if you're interested in diorama cards (3D boxes that fold flat and fit in an envelope for mailing.) 


Friday, January 27, 2017

Pezember Valentine with Hugs!

I've been playing around with Peter Fruehwirt's tangle Pezember.  It starts out like W2, then goes in quite a different but pleasant direction!


Sometimes I first try a tangle in my bullet journal, like I did here.  After a quick go at the tangle per the stepouts, I knew I wanted to try it with the curved lines of Huggins.  Immediately that morphed into hearts 


Then this Bijou that enjoys a little Static.

I thought I'd try my second YouTube showing you my valentine variation.  Enjoy! 


Friday, January 20, 2017

Fluxing around with Skwim ...and a video!

Wanting to focus, I tried something new with something old.  Skwim, to me, is very familiar.  Videos, not so much.  The end result is a drawing surface to "frame" my tiles as I'm drawing, providing a pleasant background and a slightly cushioned surface. I had hoped that you'd enjoy my first video, but after much effort and time, I accidentally deleted it prior to uploading it!  Sorry, you not only miss how this project evolved, but you also miss Yoda (my cat) helping me tangle.  Perhaps you're the lucky one, I'm not sure.  So, please enjoy my second video!  I've also added below some information about the "missing" video.

If you find the video helpful, relaxing, or inspirational, please let me know.  I would very much appreciate your constructive criticism and feedback.  I'm not sure if I'll continue with the video format, your comments (or lack thereof) will help me to decide.  

Wishing you peace and calm....
Betsy CZT14

Supplies used:
A remnant of mat board in a gray green color 
Crafter's Workshop 12x12" stencil-Daisy Cluster
Copic markers and airbrush
Sakura Pigma micron 03 black
Fabrico Marker in cool gray
Faber-Castell Polychromos 
General's charcoal white

Tangles: Skwim, Flux, Tipple and a touch of a Fescu/Zinger combo.


Friday, June 17, 2016

Organic gardening, Maryhill style!

Tangles: Maryhill and Leaflet variation
Now this gardening is for me! I hope you give it a try too!
My inspiration was this Doily stencil by KaiserCraft. See those overlapping Crescent Moons on the outer edge? And the triangular shapes they make when overlapping? Triangles equate to Maryhill for me. I just knew Maryhill could be organically transformed into a mandala, or considering this is a Zentangle pattern, a Zendala!
Here are the basic steps:
I started with a Zenstone or gem and its bezel. All that means is an orb and aura that shape. I think you could also try lots of different shapes besides a circle though too.
Then add the Crescent Moon shapes back to back around the outer orb. Don't stress out over making them the exact same size. It doesn't matter how many moons (or petals) you have, just try not to go small as you will be splitting them and filling them in.
Then, divide your crescent shapes by starting another crescent at the midpoint. Continue around bisecting each Crescent moon shape.
Here's a closer look at what's going on there.
Now fill in each section with Maryhill.
Initially I filled in all the sections, but a nice variation is to leave the outer edge empty (see the blue beauty below).
Continue growing your mandala by adding more Crescents and dividing them with more Crescents.
You can shade as you normally would Maryhill, or try color where you normally add graphite, or....just play with it until you have what you like!
I hope you enjoy!

Friday, May 20, 2016

Triangulation

The Diva's challenge this week was to add a bit-o-black. I worked on a sort of paradox meets rounding sample in my journal, sort of an imitation paradox. As I compared it to the true paradox tangle, I knew there was something in my attempts, but exactly what I didn't know. I set it aside for a few days. I thought about other ideas for this week's blog post. I went to YouTube one day and found this cool origami snail. I watched the video and thought, hey, I can do that one! I tried it on a 6" square piece of origami paper (the orange). I thought it could probably hold a Bijou tile if it was larger! So I tried a piece of fabulous Paper Parachute paper (the swirly turquoise in the photos below). The pattern was awesome, but the paper was just too thick for this project. (Everything I've ever tried from them, stamps, paper, has been really nice quality. This paper was no exception. Just not made for origami.) Ok, what about copy paper? I tried that too but it was also too thick. I was thinking I needed a trip to the craft store to look for larger origami paper, but then I had a moment of clarity...(in my sleep!) and remembered I had double sided wrapping paper that just might work! I ended up cutting it to 10.5 inches square for the snail that has the bijou tile tucked in it. Fun! It does topple over quite easily tho.
Ok, by now, I had procrastinated the week away regarding my blog post. But I thought this morning (Thursday as I'm writing this) that it would just be a quick Bijou tile and I'd be done. Then I saw my drawings in my journal and I knew I had to work on that some more. The lines of the square and cadent-like shape reminded me of the origami snail....what was Bijou trying to point out to me? I was a little distracted at first thinking I had a new tangle and took these pictures.
Ugh, the ink wasn't dry and I picked up a glob on my hand accidentally and redeposited it on my tile. No mistakes! Guess I'm filling it in :-)
The more I played with those little triangles, the more I realized I had another technique, or tanglenhancer vs a tangle. Cool! So, similar to rounding, it adds black but instead of the gentle curve, the angles tend to elevate or lower your design. I hope you give triangulation a try!
Bijou reminds me that sometimes it takes a long time to get where you're going...