Showing posts with label Zendala. Show all posts

Saturday, July 28, 2018

Pentangles

Last week's hexagon tile led to a fragment study.  It's not quite ready to post.  So, I thought I'd take a slight break from my fragment study and share these.   One of my fragments inspired these pentagon tangles (pentangles).  Both were complete on Zendala tiles.
String that divides tile into 10 segments in the middle and only 5 extending to edge.

Both tiles have the same string, except the outer circle is smaller on one.  
Maryhill and Paradox only partially shaded.
Notice how shading Maryhill adds to the lines of the pattern (only the top two arms are shaded here). 

No shade yet.

And this photo is prior to all shading.  

Aren't they cool?  
Paradox and Maryhill, one of my favorite combos.

Maryhill, Skwim, Mooka and a touch of Flux

I'm hoping they inspire you a bit.....and that you check back again for my fragment study!  

TTFN!

Friday, July 13, 2018

Borromean Rings

Still "studying" A Beginner's Guide to Constructing the Universe by Michael S. Schneider.  And it touched on Borromean rings in chapter 3.  No two rings interlock, but the 3 together lock as one. Now that seemed like a cool string...
PP3 Borromean Rings on a 3Z :-)

This 3Z combines the Zentangle Project Pack 3 and the rings.  Yup, the whole project on one small tile.  The color is from gelatos and colored pencil.  That background leaf in the photo is from a fun day with Washington CZTs learning about Eco dyeing.  Thanks Lynn, that was a fun afternoon!
Zenith Borromean Rings on 3Z

Another set of rings on another 3Z.  Yah, it's a bit busy so you might not recognize it if I hadn't told you there were Borromean rings in there.  


And then trying to break it down and actually assemble a set, I die cut 3 circular frames using nesting dies (but you could also draw them with a compass, or simply trace around a couple glasses).  
E6 Fragment in a Zendala Ring.

This first is simply a fragment, E6.  
Zenith Zendala Ring

Yes, another Zenith :-)
Zenith/Diva Dance Zendala Ring

Surprise, Zenith with Diva Dance.  
Borromean Rings meet Zentangle.

And assembled after cutting slits in 2 of the rings.

Thanks for stopping in!


Thursday, May 10, 2018

Diva Challenge 360 (finally)

This was the challenge a few weeks ago.  The challenge was a duo tangle Shattuck vs Tripoli.  Mine was so busy I had trouble finishing.  When I brought out the the Copic grays it finally calmed it down and made sense.  Hope you like it....thanks for stopping by.
My brain on Shattuck/Tripoli :-)

Monday, December 25, 2017

Wishing you a merry holiday!

Just a few recent cards I've created and a wintertime photo....

Using an oldie but a goodie rubber stamp from Penny Black, winter glow!  I think I can finally do it justice (?) years after I bought it!  Here I used distress inks.

And a paint chip sample can make a pretty darn good background on this Copic colored image from Altenew, Beautiful day.

And a card I had a lot of fun with.  It's just a single turtle image that I repeat stamped to form the circle mandala.  It's a stamp from a set Under the Sea by Inkadinkado.  Then I tangled Quipple with colored microns and then added colored pencil for shading.  

And it needed a custom envelope, so this one is made from a recycled calendar page.  

The view looking up on a recent walk.

Have a great holiday season! Thanks for stopping by.

Saturday, November 18, 2017

Be Kind To Elephants meets Go Big or Go Home

#BeKindToElephants
After viewing Ellen's YouTube I knew I needed to use it as a drawing string.  It was just calling out to me.  And what's bigger than an elephant for Laura's Go Big or Go Home Challenge?
After tracing on the graphic

Please check out the video, (link above) and if you're on Twitter, retweet.  As I'm not on Twitter, I'm hoping posting my version of her graphic here will get some attention to the cause.  
Ha, the ink covered up my outline :-0

I used a circle die cutting a large Zendala (about 7 1/4 inches diameter) from Bristol vellum. After printing out this article I found on the Ellen's campaign (I think I printed the page with the graphic at 175%?) I decided then to try this stencil technique to add some color and texture.  I probably would have started out with watercolor paper or mixed media, had I realized I was going to do this technique from the beginning.  In the end, the Bristol worked ok with the stencils and it was lovely to draw on later.  I transferred the drawing to the paper using graphite on the back of the printed page and tracing it out (old school). I used Sakura PN microns and a 5.0 Graphik Line maker, graphite and colored pencils to tangle Enyshou, Fife, Nipa and Shattuck. I let the stencil dictate some of the lines and tangles.  
After tracing the design (again :-)
Enyshou got me started

Thanks for sharing your support, however you can.  


Sunday, October 1, 2017

Where did September go?

My finished September calendar.  I'm really happy how this Assunta tangle worked out.  Now, what to do for October?
first tile ever with grandkids!

We were busy traveling for part of the month. The best part of September was tangling with my grandkids.


Last week's Diva Challenge was crazy 'NZeppel. I used a very old tile that had a string from a stencil.  Sorry I forgot to photograph it before I started.  I chose to ignore parts of the string and I added more lines here and there.  

My end result on this Apprentice tile reminded me much of my earlier polished stone 'NZeppel.  

And my first try at Well well well.  Mine is on a hand cut tile from brown cardstock.  The brown is close to the color of a bag I want to tangle and I thought I'd try out colors to see if the brown and black would show up on such a dark color.  

I'm glad I have Zentangle® to help keep me centered with all the chaos in our country and in the world.  I still wonder if I'm making any difference whatsoever, but at least I can gather my thoughts and breathe amid the chaos if I just take it one step at a time.  

Thursday, August 3, 2017

Purple and blue

Several weeks ago, guest blogger Jessica Davies' Diva Challenge 324 Tangled Heart, was to use hearts for a string.  Not long afterward, I came across a Kirigami book showing how to cut out a heart shaped doily. I totally had forgotten I had it!  I ran across it while continuing on my KonMari project.  If you haven't seen Jessica's gorgeous hearts, please check them out.

Before I got around to cutting out the doily, Jessica was already on to her second guest post, Diva Challenge 325 using Pea-Nuckle. I decided to combine the two challenges.  

After cutting the doily from scrap paper and a nearly 6" diameter circle from Bristol card, I airbrushed over the doily to create this string.  


That's my take on Enyshou along with Pea-Nuckle using blue and purple microns.  In the photo above, you'll notice only the top portion is shaded.  I shaded using Cretacolor watercolor pencils.  


Finally finished!  There's also a touch of Fabrico gray marker in this final photo.


Thursday, March 2, 2017

Marasu & Molygon for the Diva & Color challenges

The Diva challenge this week piqued my interest.  Then I saw the 30 day color challenge....

The Diva challenged us to a duo tangle.  JUST 2 tangles, Molygon and Marasu.  For links to the individual tangle stepouts and to see what others have done with this challenge, follow this link.  

This was so fun!  My final tile looks complicated, and would have been if I hadn't taken it just one step at a time.  Let me take you through it:

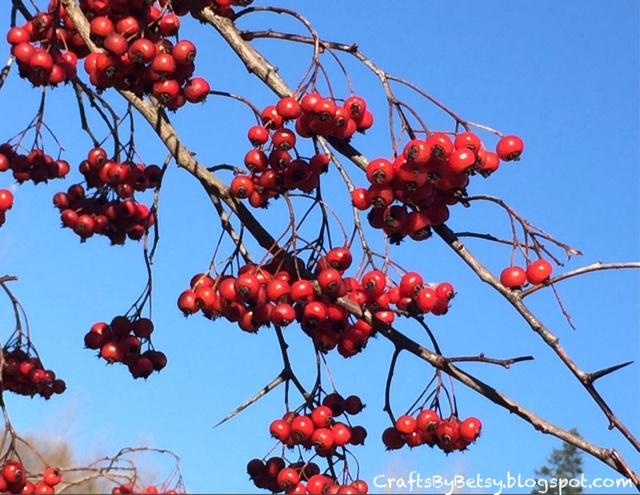
First I drew Molygon in an organic spiral with my black micron on a renaissance Zendala.  I started with the small "orange slices" in the center getting larger as they spiraled out organically.  At first I tried not to let them touch, but midway, that just wasn't working, so I let them stack on top of each other in Hollibaugh fashion.  

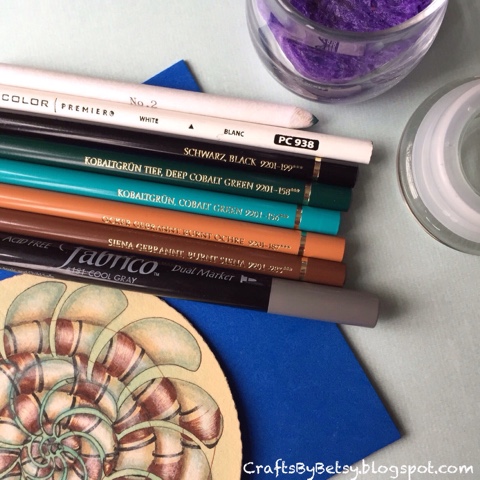
Adding some color:  Because I envisioned drawing a spiraling Marasu over Molygon, I thought some color added between The Molygon slices would help me to differentiate between the 2 tangles. Turns out, this step helped tremendously later.  I used a Tombow marker and my waterbrush so I could feather out the color for a subtle blend.  I scribbled color on my laminated cardstock.  (You could use a blending palette, craft mat, a piece of plastic or acetate.) And picked it up with the waterbrush. Laying it down with less water in the center, more water toward the edge of the tile.  

The next step is patience.  You MUST let the tile dry before moving forward.  I let mine sit for a couple hours, although you could dry it with a hair dryer or craft heat gun.

The next step was was a little scary.  I took my brown micron and drew a spiral over the Molygon.  Just totally ignoring the Molygon.  I thought about using a pencil string, but in the end I just went for it with my micron.  

Then I used that brown micron to draw in the larger stripes of Marasu by wrapping the stripes around my spiral lines, working outward from the center.  I only drew on the Mollygon slices.  I skipped over any of the blue green.  I think this might have gotten confusing quickly if I didn't have that color wash down.  With it, it was easy to skip over the blue green areas.  

Next I added narrower black lines.  It was easier this time to work from the outer edge toward the center.  I wasn't quite sure how to end the stripes, and thought I might return to the outer edge later, but in the end, I liked it that way.  

More color:  Next I added shading by adding the darker brown Polychromos color to the lower edge of the brown spiral line, again trying to only add it to the Molygon and skipping over the blue.  I blended this color with a blending stump and odorless paint thinner.  I added a lighter brown on the other side of the spiral line.

Then Molygon was pretty hard to see so I added the blue greens around the edges of Molygon and blended.  

The Renaissance tiles look fabulous with white.  One problem I have with the Generals white charcoal is that I can't really add layers on top of it.  Because I thought I might need some more layers, I used my white Prismacolor.  I'm a fan of the Polychromos, except I must admit that I like the white in Prismacolor as it shows up better.  So my next step is adding white in the spiral of Marasu.  I used a dry tortillion to blend it somewhat.  

I felt the Marasu needed to pop more, so I added black to the spiral edge.  
Marasu/Molygon duotangle

I liked that, but felt it needed more, so I added the gray Fabrico Marker too.

During all of these steps, you're just focusing on one step, not the overall picture.  When I took the time to take it all in, it was so cool to get lost in the 3D effect spiraling in and out.  

One last note, I try to indicate my inspirations whenever I recognize them.  Sometimes it's hard to remember just where I saw something, or to notice that I've been influenced by ....(colors, moods, people, TV, YouTube, magazines, etc etc). There is so much that affects me at least subconsciously.  This time, I knew my overlaying the tangles wasn't an idea I came up with, just an idea I wanted to try.  I thought it was Margaret Bremner who had inspired me, quite a while ago.  I looked back through her blog, and sure enough there it was...here's her post on overlaying tangles.  

So this piece was my response to the Diva AND my first day of coloring for the color challenge.  I hope to post some more coloring examples soon, I have some new stamps that are calling out for color... ;-)

Thanks for your comments!  Have a great day!


Friday, September 16, 2016

Class lines

I had a really fun class last week. We focused on parabolic lines and stringing Zendalas®. I prepared these kits in advance. The boxes housed blank Zendalas, a drawing surface, protractor, bijou tiles, pencil and a bookmark ready to be tangled on. I used an envelope die by Sizzix to make the boxes, scoring additional lines to convert it from an envelope to a box.


Wow, look at all those strung tiles!  And all were done without the use of a straight edge!  Cool right?
Check back next week for a closer look at bookmarks I've been making.
Have a wonderful week!

Friday, September 2, 2016

More stamping and tangling


It's hard to believe that this cling stamp
combined with this stamp block that fits into this gear (all products of Inkadinkado)
created the string for this tangle of Isochor.
It's been waiting some months for me to finish it. I guess it was just waiting for me to catch up with my gray techniques, reticula & fragments. The original circle was die cut from watercolor paper. After stamping the string (I believe I used pigment ink in a light tan or gray...like any Zentangle® string, it disappeared when I drew with my pen) I tangled Isochor with black Sakura Micron.  So that was several months ago.  This week I added Fabrico gray marker around the Isochor cluster. Then my Tripoli reticula with Graphik Derwent Pen adding Prismacolor white pencil and Uniball Signo Angelic for hilights.  Then I added graphite and some more Fabrico cuz I couldn't stop!  I'm really happy with the final(?) result!

Have a wonderful week!